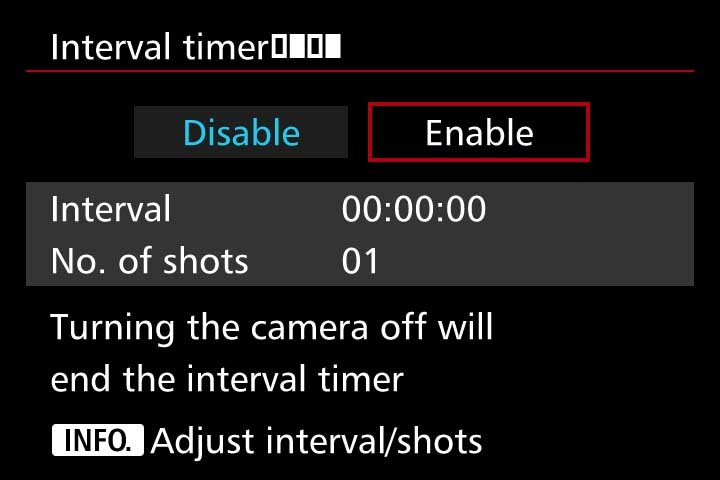
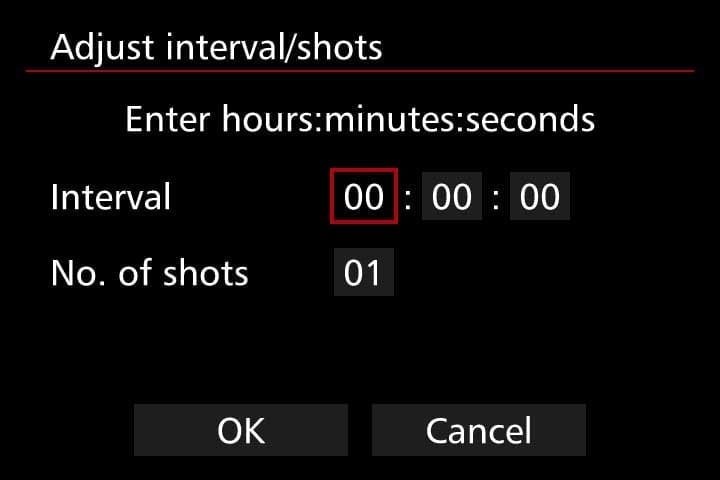
Jednym z najbardziej dynamicznych sposobów na dodanie wrażenia i natychmiastowe oddanie upływającego czasu w filmach jest nagrywanie filmów poklatkowych. W tym samouczku przyjrzymy się kluczowym wyborom, jakie masz do nagrywania i edytowania filmów poklatkowych, aby mieć pewność, że będą one miały profesjonalny, wizualny efekt.
Czego się nauczysz
- Wybór między robieniem zdjęć a filmowaniem
- Obliczenia wymagane do nagrywania filmów poklatkowych
- Dlaczego szybkość obiektu jest kluczowa
- Najważniejsze wskazówki dotyczące nagrywania filmów poklatkowych
- Dlaczego jakość materiału filmowego jest kluczowa
- Zalety fotosów dla timelapse
- Jak zmienić standardowe klipy wideo w timelapse
Czego będziesz potrzebować
- Aparat z opcjami fotografowania, najlepiej co najmniej 1080p, jeśli nie 4K
- Aparat z ręczną kontrolą wszystkich ustawień ekspozycji
- Niezawodna obsługa aparatu, która pozostanie nieruchoma
- Kalkulator do obliczania wymaganych ustawień fotografowania
- Komputer z profesjonalnym oprogramowaniem do edycji obrazu i/lub wideo
Filmy poklatkowe to świetny kreatywny sposób przedstawiania upływu czasu w filmach, na przykład z dnia na noc, lub dokumentowania zmian, takich jak przypływy i odpływy lub kwiat powoli otwierający się w świetle słonecznym. Często są twórczo wykorzystywane w telewizji i filmach.
Na przykład amerykański serial detektywistyczny „Rizzoli &Isles” często wykorzystuje krótkie sekwencje poklatkowe, aby zaznaczyć przejście jednego dnia przez noc do następnego dnia, podczas gdy serial „House of Cards” wykorzystuje upływ czasu w sekwencji napisów początkowych.
Ale jak powinieneś nagrywać filmy poklatkowe i jakie najlepsze wskazówki i techniki pomogą Ci nadać im większy efekt?
Tryby zdjęć i filmów poklatkowych:jak wybrać
Tradycyjnie filmy poklatkowe były tworzone przez rejestrowanie serii nieruchomych obrazów aparatem — często za pomocą wbudowanego interwałometru — a następnie edytowanie ich razem w celu utworzenia fragmentu filmu poklatkowego. Daje to kontrolę nad wszystkimi plikami nieruchomych obrazów, ale może być czasochłonne, jeśli trzeba nad nimi pracować i edytować je przed utworzeniem ostatecznego efektu poklatkowego.
Alternatywną opcją, która jest dostępna w niektórych obecnych aparatach, jest dedykowana funkcja/tryb filmu poklatkowego, który może automatycznie łączyć zdjęcia w film poklatkowy.
Aparaty z wbudowanymi trybami filmowania poklatkowego obejmują lustrzanki cyfrowe Canon EOS 5D Mark IV i EOS 80D, pełnoklatkowe aparaty Panasonic S1R i S1, lustrzankę cyfrową Nikon D850 i wiele innych.
- Samouczek poklatkowy Nikon D850:jak skonfigurować tryby fotografowania z interwałem i filmowania poklatkowego
W aparatach z wbudowanymi trybami filmowania poklatkowego wystarczy ustawić parametry odstępów między poszczególnymi ujęciami, liczbę ujęć (maksymalna dostępna będzie różna w zależności od aparatu) oraz długość końcowego materiału filmowego, innymi słowy czas odtwarzania.
Tryb filmu poklatkowego przetwarza go w pełny film i zapisuje wynik jako plik wideo. The down side with this mode is it doesn’t save images as separate files during recording so you have no control over editing individual images.
There are also timelapse specific outdoor cameras such as the Brinno TLC200, which simply requires you to turn it on, set your interval, pick your subject, record and then replay your timelapse videos in-camera.

7 key tips for timelapse videos
There are certain technical considerations and parameters that you need to remember for shooting timelapses:
- As you’re creating a video, for every one second of video you’ll need to capture between 24 and 30 frames. For example, if you’re shooting 12 hours of timelapse and you take a still every minute you’ll end up with 720 still images and, at 24fps, you’ll get a 30 second timelapse. It’s best to plan how long you’d like your final timelapse clip to be and then you can do the maths to work out how best to shoot it.
- You must always consider the speed of your subject when deciding on the intervals between each shot. For fast moving subjects, such as cars or people, this will probably be well under one second whilst documenting a slowly changing landscape may only require a few shots, or a few dozen shots, per day.
- Always do a series of test shots to see if your framing, exposure settings and the chosen intervals between each still image will work. I would recommend setting exposure manually, or at least using aperture priority, so you can guarantee that you retain full control of exactly what the camera will shoot when you are not behind the lens. Relying on any auto settings can cause unwanted things, like flicker, in your final timelapse footage.
- Decide on whether to shoot your stills as JPEGs or as RAW files. If you’re planning a 1080p HD movie JPEGS should be of sufficient quality but if you want your timelapse edit to be any quality above 1080p then shooting RAW files is the best option. Shooting RAW will also give you the flexibility to edit the colours in post or to zoom in or crop on the original image files. This is simply because RAW image files ‘hold’ more information and thus will give you more flexibility at the editing stage.
- If your camera gives you the option to select a 16:9 shooting ratio it’s probably best to do so – this is the traditional cinema ratio, so the result will look more natural in a movie edit.
- A steady camera is essential for timelapses, so always use a tripod. Check to make sure it is level before setting your camera to shoot so you avoid having to straighten out any footage in post-production.
- If your camera doesn’t have an intervalometer or a built-in timelapse video function you should consider using an external remote controller for your camera or even an interval shooting app. There are a few apps available for cameras and smartphones, so just check which one is compatible with your camera or phone. Examples of such apps include Framelapse, Lapse It, Hyperlapse and iMotion.
Quality of footage &exposure length
As mentioned earlier many modern cameras offer timelapse shooting functions but, up until a couple of years ago, the downside of this was that their maximum footage resolution is just 1080p. You must decide on the quality of final footage you want before choosing such a mode or opting to shoot higher res stills and edit them together in post.
The other factor to weight up when considering to shoot stills or video for timelapses is that stills will offer you the flexibility to play with exposure times. As mentioned, shooting video means you must shoot at least 24 frames per second, so no exposure can be longer than 1/24th of a second.
In contrast shooting stills gives the flexibility to shoot longer exposures and, as a direct result, you’ll potentially get timelapses with much more impact, such as star trails or car headlights at night.
How to change standard video clips to timelapses
Whilst the advice and tips mentioned earlier in this blog are the ‘traditional’ ways of shooting timelapses, there is another way… converting standard video clips into a timelapse. Many desktop video-editing suites will allow you to convert a standard clip into a timelapse movie.
For example, in Adobe Premiere Pro, you can adjust the frame rate of a standard video clip in a way that does so by ‘posterizing’ or separating the frames. So, you could adjust a 24fps video to, say, 1fps, which will give a more ‘jumpy’ effect.
You then need to adjust the clip speed/duration (say 800%) of each frame upwards so as to alter the time between each frame, in this case eight times faster. You can experiment with the speed so you get the best look out of your clip. This speed adjustment will result in a sort of stop-motion or timelapse/hyperlapse effect.
If you decide to try this route it’s best to work with clips of around one minute in length and upwards so that you have more information to work with, otherwise you could end up with a very short timelapse clip.

Keep experimenting
Like many choices when shooting video footage you have to marry up the practical side of camera settings and what you want the creative, final result to be. If you’re a newcomer to shooting timelapses it’s perhaps best to start simple and shoot a flower opening. You can then expand this to day to night timelapses and those of moving subjects.
Whatever option you choose for shooting timelapses if you follow the tips outlined above and choose a great subject you should, hopefully, end up with a great piece of timelapse footage. Keep experimenting with different subjects, different lighting situations and different camera settings and you should quickly end up with some timelapses with that are full of visual impact and tell a story.
